Maple Alps

vegetarian

Tofu Kale Scramble

RecipesAmanda Walter | Maple AlpsComment

The best part about summer is warm, bright mornings, that are the perfect temperature to eat outside. Breakfast on the deck is definitely something I miss when the cooler months prevent us from doing so. 

One of our favourites is a good scrambled tofu on a slow, Sunday morning. Honestly, Sunday mornings are probably only slow because we tend to sleep in a bit most of them and then take forever making a good breakfast, but slow nonetheless.

This post uses affiliate links

Tofu Kale Scramble | www.maplealps.com

We call our Sunday morning (alright, sometimes we don’t even eat until noon!) breakfasts “good breakfast.” and always go all out whether it’s biscuits and gravy, pancakes, or even this recipe. We love pairing this tofu scramble with fresh potato hash (ooooh, maybe I should share that recipe next!) and sometimes we’ll even splurge with vegan sausage. It’s a great time - especially if fresh orange juice is involved. 

Tofu Kale Scramble | www.maplealps.com


Making it as colourful as possible has become almost a game. Using two types of bell peppers when possible adds an extra colour, as well as this fresh kale that really ups the game. Spinach works well too and is just as delicious. Grape tomatoes add a nice read, and you can use red onion instead of yellow too! Really, you can use whatever you have in your refrigerator and it’ll turn out wonderful, promise. Well, as long as you like tofu. We are huge fans of tofu over here!


Tofu Kale Scramble | www.maplealps.com

Tofu Kale Scramble

what you need:

  • 1 block extra-firm tofu, drained and pressed as dry as you can get it

  • 1 small yellow onion, diced

  • 1 bell pepper your choice (I use half red and half orange to get more color)

  • 2 cloves garlic

  • ½ tsp turmeric 

  • ½ tsp paprika

  • 1 tsp garlic powder

  • ½ tsp sea salt

  • 1 TBSP nutritional yeast flakes

  • 2 TBSP low sodium soy sauce (or liquid aminos)

  • 1 cup fresh kale

  • 1 tbsp fresh cilantro, chopped

  • 1 tbsp fresh parsley, chopped (plus more for garnish if you like)

  • 1 TBSP oil or vegan butter for cooking

  • Salt and pepper to taste


What to do:

  1. In a pan, heat your oil. When heated, add onion and cook 1-2 minutes, until soft

  2. Add bell peppers and cook 1-2 minutes, until soft

  3. Add garlic and cook another minute, until fragrant

  4. Add sea salt, turmeric, paprika, garlic powder, nutritional yeast flakes, and soy sauce to vegetables and mix well

  5. Crumble tofu on top and then mix well with the vegetables, until tofu is coated

  6. Add fresh herbs and kale and mix through, cooking another few minutes, until kale is wilted

  7. Add salt and pepper to taste and serve immediately (stays good in the fridge for about two days)


What is your favourite breakfast/brunch food?



Chocolate Chip Oatmeal Muffins

RecipesAmanda Walter | Maple Alps1 Comment

I don’t know if you’ve figured it out yet, but I have a soft spot for any kind of baked good. I will admit that I don’t gravitate toward them as much as I used to, due to taste buds changing and the desire to be more healthy, but if you hand me a muffin, I’ll at least take a bite.

I wanted to add some more nutrition to my original banana chocolate chip muffin recipe, and I’m not sure that I really achieved that since I kept the chocolate chips (you can substitute with nuts to make a nutty banana oatmeal muffin), but they turned out so great that I’m sharing the recipe with you here.

This post contains affiliate links

Chocolate Chip Oatmeal Muffins | www.maplealps.com

These muffins are sweetened with banana and maple syrup. I suppose the unsweetened applesauce could naturally add some sweetness too, but you can’t even tell it’s in there.

Make sure to cool these babies completely before eating them - they tend to stick to the paper liner. Alternatively, skip the paper liner completely so you don’t have to worry about that.

I keep these in the fridge and enjoy them with breakfast with a hot cup of tea. Mmm.

Chocolate Chip Oatmeal Muffins | www.maplealps.com

Oatmeal Chocolate Chip Muffins

What you need:

  • 1 large ripe banana, mashed

  • 1 cup whole wheat flour

  • 1/8 teaspoon salt

  • 1/4 cup maple syrup

  • 1/8 cup melted coconut oil

  • 1 tablespoon ground flax seeds

  • 3 tablespoons hot water

  • 1 teaspoon natural vanilla extract

  • 1/2 cup rolled oats

  • 1 1/2 teaspoons baking powder

  • 1/4 cup chocolate chips (or chopped nuts of your choice)

  • 1/8 cup almond milk

  • 1/2 cup applesauce (I’ve also had great success with plain soy yogurt)

  • extra chocolate chips/nuts and oats to top (optional)

what to do:

  1. Grease or add liners to a cupcake or muffin tin and preheat the oven to 350ºF

  2. Make flaxseed egg by mixing the ground flax and hot water in a bowl and let sit

  3. Mix your dry ingredients in a large mixing bowl

  4. Mash the banana and mix the wet ingredients in a smaller bowl

  5. Add wet ingredient mixture to the dry ingredients and stir until well mixed

  6. Fill pan cavities and top with extra chocolate chips and rolled oats if desired

  7. Bake for 25 minutes, until a nice golden brown

  8. Remove from oven and transfer muffins to a wire rack (I use these from Amazon and love them!) and cool completely before enjoying (if they are not cooled completely, they tend to stick to the paper liner if you used one)

Store these in an airtight container in the fridge for up to three days.


What do you like adding to your muffins?


Easy DIY Vegetable Broth

RecipesAmanda Walter | Maple Alps5 Comments

Over the last few years, I’ve been getting closer and closer to near-o waste. Not quite zero, but almost there. Vegetable broth was one of the easiest switch ever! Not only did it cut down on vegetable scrap waste, it cut down on the waste produced by buying tetra packs of vegetable broth.

It is so simple! It took me forever to get this onto the blog, but today is the day.

This post contains affiliate links

Easy DIY Vegetable Broth | www.maplealps.com

The key to this broth is your collection of vegetable scraps. I collect these over time and keep them in my freezer. It’s simple: onion ends, carrot peels, celery ends, you name it. I make sure to clean everything well before peeling or adding. Sometimes I’ll add vegetables that are starting to wilt to my collection if I won’t be able to use them in time. I stick these scraps in a jar or in a baggie and keep them in the freezer until I am ready for them.


I whip up this broth in my Instant Pot, but it’s just as easy to do it on the stovetop or in your slow cooker as well.


Once the broth is made, it will stay good in your fridge for a few days or in the freezer for 6 months. I prefer the latter, by the way. Just requires some planning when you’re ready to use it. If I want to use it, I’ll stick it into the fridge overnight and it’s ready for me the next day!


I really enjoy being able to make my own pantry staples and knowing exactly what goes into what we eat!


Some recipes that use vegetable broth:

Easy DIY Vegetable Broth | www.maplealps.com
 

Easy DIY Vegetable Broth

What you need:

  • Large onion, in large chunks with papery skin still on

  • 3 carrots, scrubbed, skins still on

  • 3 stalks celery, scrubbed, leaves still on

  • 8 cloves garlic, crushed

  • 2-3 cups veggie scraps

  • 1 TBSP parsley (dried or fresh)

  • 1 TBSP thyme (dried or fresh)

  • 6 springs fresh rosemary (optional)

  • 3 bay leaves

  • 2 tsp sea salt

  • 10 cups water


Instant Pot Instructions

Add everything to the instant pot insert. Set on manual high pressure for 30 minutes and release steam manually. (Continued below in bold print)


Stovetop Instructions

Add everything to a large stockpot and allow to simmer at least 1 hour. (Continued below in bold print)


Slow Cooker Instructions

Add everything to the pot insert and cook on high for at least 5 hours. (Continued below in bold print)

Allow broth to cool. Once cooled, run through a fine sieve and store in large jars or containers.


PS: Another great way to use food scraps like citrus is making an all-purpose cleaner!


Shop This Post


What kinds of pantry staples do you make from scratch? How do you cut down on food waste?


DIY Vegetable Broth | www.maplealps.com

Delicious Vegan Lemon Loaf

RecipesAmanda Walter | Maple Alps2 Comments

I can hear you now: “Amanda! Finally, something sweet that doesn’t involve strawberries or chocolate!”

Yeah, yeah.

I have always loved a good lemon loaf. Something about those tangy, sweet tones just really makes my tastebuds soar.

Delicious Vegan Lemon Loaf | www.maplealps.com

A strange thing happens when you change your diet. Suddenly, things that used to be delicious to you start to lose their appeal. This started happening to me with lemon loaves filled with sugar and dairy. They were too harsh on my stomach and the taste was overwhelmingly sweet. I had no choice but to set out and make a version that would suit me better.

Yes, it still has sugar in it (and on top of it if you glaze it!), but I get to control it. I also get to control how tangy I want it, and I do love me some tang!

But enough about me!

This loaf boasts ten ingredients - 11 if you choose to glaze it. You can also substitute the oil for applesauce to make it oil-free and it is still as delicious.

Oh man, I’m ready to jump offline and run to the kitchen to whip up one of these bad boys. So much yum! The only thing I can’t decide on is if this loaf is breakfast appropriate. I think I’ll vote yes.

Vegan Lemon Loaf | www.maplealps.com

Vegan Lemon Loaf

For the Crust:

  • 2 cups flour

  • 1 tsp baking powder

  • ¼ tsp baking soda

  • ½ tsp sea salt

  • ½ cup cane sugar

  • 1 cup nondairy milk

  • ½ cup vegetable oil or vegan butter or applesauce

  • ¼ cup fresh lemon juice

  • 1 tbsp lemon zest

  • 1 tsp vanilla 

For the Glaze (optional, but encouraged)

  • 1 cup powdered sugar

  • 1 tbsp nondairy

  • 1 tsbp fresh lemon juice

  • 3 tsp lemon zest (optional)

what to do:

  1. Grease a loaf pan and preheat the oven to 350ºF

  2. Mix your dry ingredients in a large mixing bowl

  3. Mix wet ingredients in a smaller bowl

  4. Add wet ingredient mixture to the dry ingredients

  5. Stir until batter is well mixed and pour into prepared loaf pan

  6. Bake for 45 minutes, using the toothpick test to make sure it is baked through

  7. Remove from oven and allow to sit for 10 minutes

  8. Move loaf to a wire rack and cool completely before adding glaze

  9. Make the glaze by whisking together all ingredients

  10. Pour over loaf. I like to let the glaze harden before digging in

  11. Enjoy!


What kinds of loaves are your favorite? I have so many favorites I can’t decide, but this lemon is definitely on the top of that list :) Leave your favorite in the comments.

Trying this recipe? Don’t forget to tag #MapleAlps so we can see what you’re up to! :)


Fav Ever Vegan Lasagna

RecipesAmanda Walter | Maple AlpsComment

I have had this post in my draft folder for two years now. TWO WHOLE YEARS (ahem, and a few months)! I am so excited to FINALLY be able to share this vegan lasagna with you. I’m leaving the text below as it was because, well, it’s more or less relevant to my life, and the instructions are the same anyway.

School is back in session, and sometimes I'm out of my house for about twelve hours each day. The commute each way is about 45 minutes, I get there an hour early, and depending on the day, I stay pretty long afterward as well to grade and prep so that I can "sleep in" the next morning. My poor husband, though extremely supportive of me, has started missing my homemade food. It was a whirlwind summer with a lot of traveling and guests that left literally zero extra time to prepare my home for the school year. Those first few weeks, I was just waiting for the long weekend so I could get some meal prep done (but hey, at least my classroom stayed organized!). I decided to take some time early one Sunday morning to get some stuff baked for the week, and I defaulted to one of our favourites: vegan lasagna. 

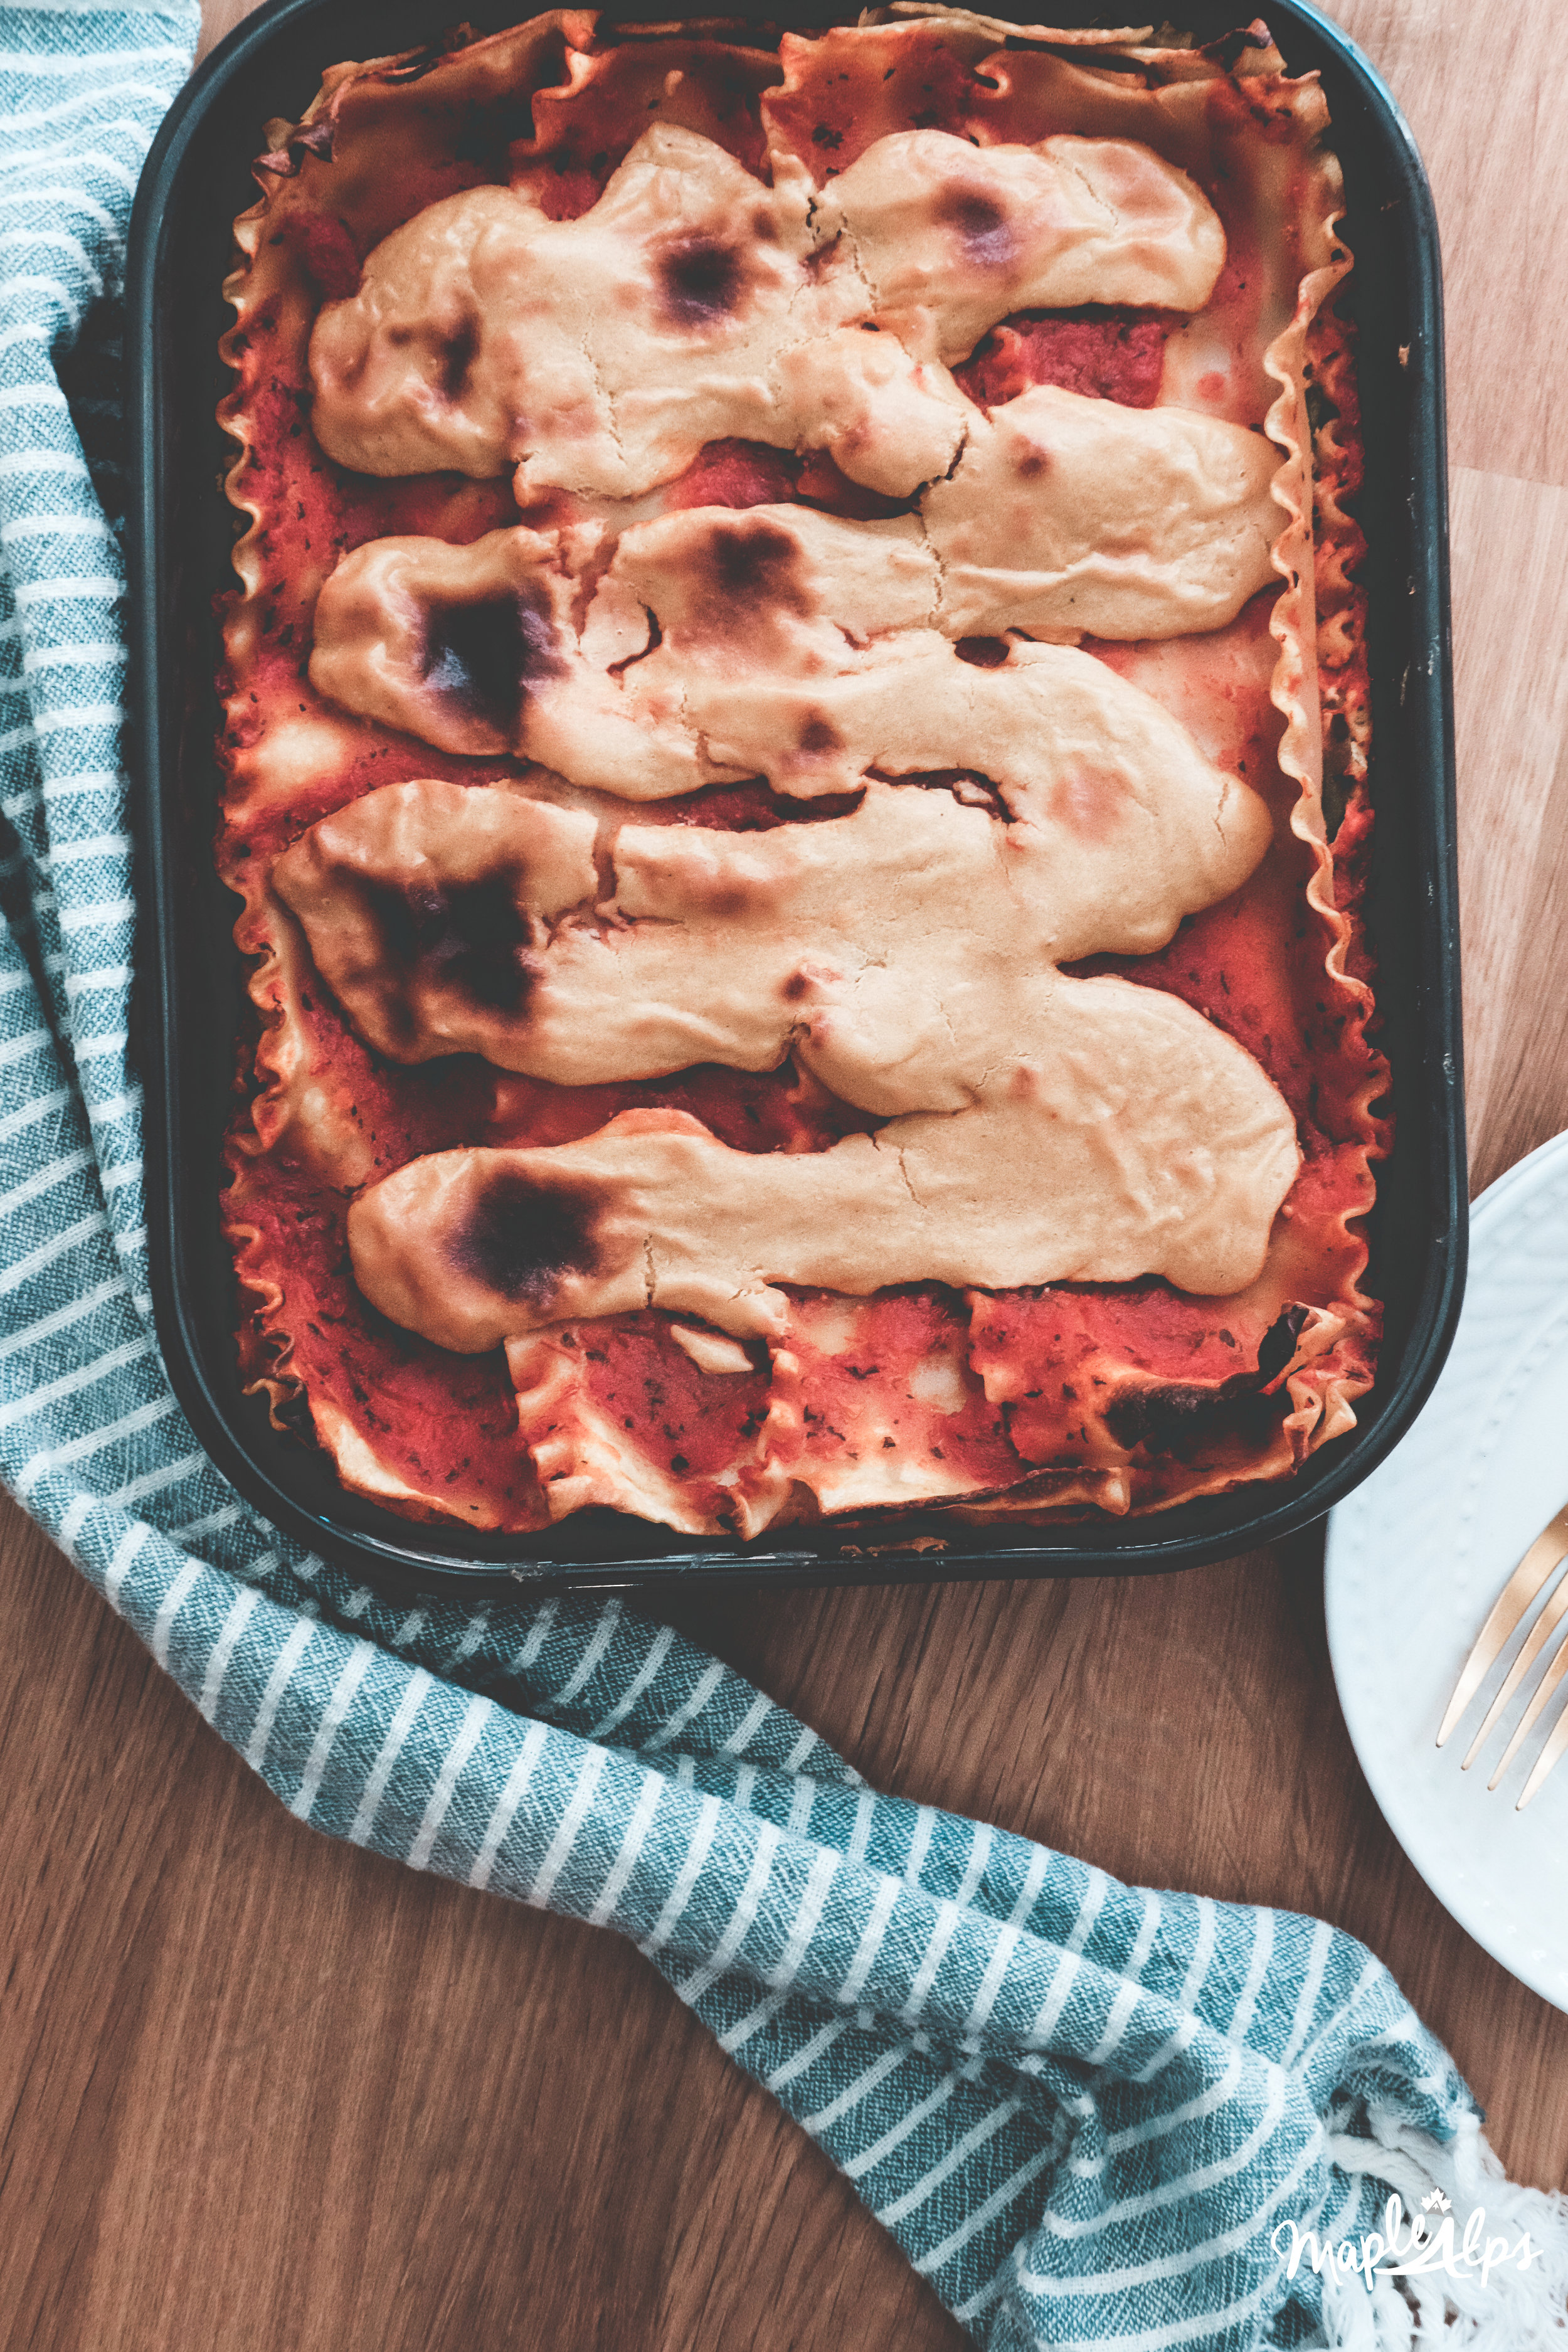
Best Ever Vegan Lasagna  | www.maplealps.com

It doesn't take too long to make - the baking part takes the longest. It just requires four main elements: tofu ricotta (which I mix with spinach), cashew cream sauce, tomato sauce and lasagna noodles, of course. 

If you, like me, have had bad experiences with the dairy-free version of this classic comfort food, rest assured that this one is actually pretty darn delicious. The first time I made it, my husband didn't even miss the cheese!

Best Ever Vegan Lasagna  | www.maplealps.com

This lasagna freezes well, and you can even assemble and keep it in the fridge for a few days before baking if you need to plan ahead!

I actually pursued this lasagna hard. I remember having a terrible vegan lasagna experience and I never wanted something like that to be recreated in my kitchen. The kicker is that this bad experience was almost 15 years ago and I still remember it vividly. So I am very excited about this one and that it tastes great!

Best Ever Vegan Lasagna  | www.maplealps.com

You can use your favorite tomato sauce and noodles for this! I like the kind of noodle that you cook first before baking. The texture is just nicer to me. Plus, your sauce goes a bit further I find and you’ll have a saucier lasagna - which I prefer!

The recipe for the lasagna is for a pan that is smaller than 9x13, but I’ve included some changes for that size in the notes.

Best Ever Vegan Lasagna  | www.maplealps.com

Best Ever Vegan Lasagna

What you need:

  • 1 recipe of Vegan Tofu Ricotta (possibly 2 for 9x13 pan) 

  • 2 cups spinach (4 cups for 9x13 pan if double the ricotta)

  • 1 recipe of Cashew Cream Sauce

  • 1 package lasagna noodles of your choice

  • Your favourite tomato sauce (more for 9x13 pan)

What to do:

1) Preheat oven to 350ºF

2) Prepare the ricotta and cashew cream sauce

3) In a large bowl, mix spinach and ricotta well.

4) Begin layering by adding about 1 cup of the tomato sauce to the bottom of your baking dish. Top with noodles.

5) Add layer of ricotta and top with more sauce.

6) Drizzle cashew cream sauce 

7) Repeat layers (steps 4-6) until finished. Add a final layer of noodles and sauce

8) Bake covered for about 30 minutes. Add the rest of your cashew cream sauce to the top and bake, uncovered, for another 20 minutes. Then broil, watching carefully, until top is a beautiful brown (Make sure you can broil with the pan you use)!

9) Let the lasagna cool for 15-20 minutes (very important so it doesn't fall apart!)


Don't you just love a good lasagna? 


vegan pantry maple alps
 
Best Ever Vegan Lasagna  | www.maplealps.com