Maple Alps

Natural Living

I Switched to a Menstrual Cup and Here is What Happened

Natural Living, HealthAmanda Walter | Maple Alps30 Comments

Word of caution: if you are squeamish, you may want to skip this post. I went back and forth with writing this post but finally decided to. With Earth Day this last weekend, it turned out to be pretty much perfect timing, even though I didn't intend it that way. I'm not one to talk to the world about traditionally private issues, but my life has changed so drastically, that I can't keep silent! This is just one post that I plan on writing about this topic, so stay tuned! By the way, there are affiliate links used in this post, but know I only suggest products I've tried and love!

As you know, I'm constantly looking for ways to save money, to create less waste, and to eliminate as many toxins from my lifestyle as I can. Feminine hygiene was never something I thought to even consider, but it turns out I was wrong, and I'm okay with admitting that to the world. 

First off, I had no idea that there were so many potentially harmful chemicals used in the manufacturing of pads and tampons. Chemicals are used to bleach the product white, and even aid with absorption. Of course, there natural, chlorine-free and 100% cotton products available, as well as cloth options, but my next concerns were cost and also waste production.

According to a quick Google search, most women use a lifetime estimate of 11,000 pads or tampons! That is a lot of trash! If you think that you are just one person, think about the billions of females on earth who each menstruate for about 40 years of their lives...that sure adds up to hundreds of pounds of disposable products in landfills all over the world. These products also contain plastics that do not break down very easily if at all.

I Switched to a Menstrual Cup and Here is What Happened | www.maplealps.com

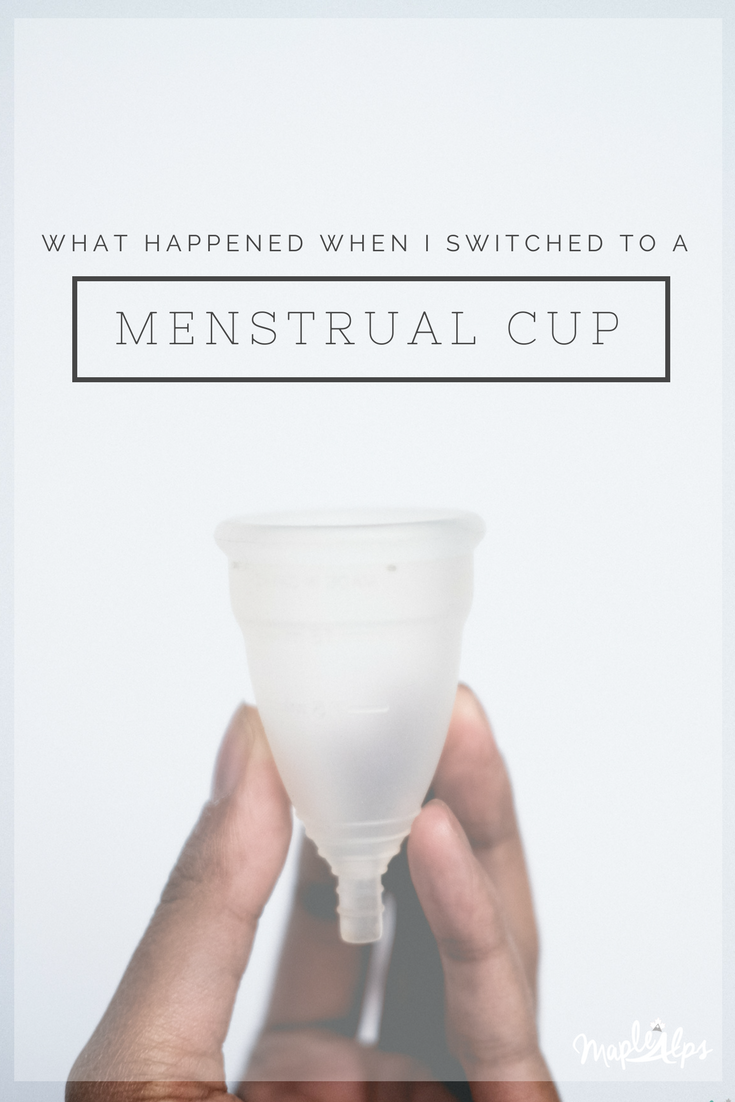
I toyed with the idea of a feminie hygiene cup for over a year before taking the plunge. I could not get my head around a cup going in places the sun doesn't shine (sorry). I went back and forth, watched countless Youtube videos (the ones where they put the cup in a glass tube, haha!) and read a plethora of articles about all things menstrual cups.  I actually think I informed myself a little toooooo much, because this went on for so long. I even tried other eco ways that didn't involve the silicone goodness (more on those experiences later!!) Finally, I just decided it was time to jump in with both feet. I walked into a drugstore with the sole purpose of buying one of those silicone babies (upon reflection, I'm not sure why I didn't just get one online...), found my size (there is a pre-baby and post baby option), put down my money, and walked right out.

I didn't expect to love it right away, but I did. While there definitely was a learning curve, I stuck it out, stayed persistent, and it paid off. After just one cycle of use, I was already convinced and [almost] looking forward to the following one. I never thought any sentiment even close to that would happen, but it did, and I was sold. 

 
Most women use a lifetime estimate of 11,000 pads or tampons! That is a lot of trash!
 

After a few months, my convictions stayed the same. I love how easy it is to use, how there are no risks for things such as Toxic Shock Syndrome, how there is no smell (!!!!!!!), and the fact that the trash can has not once been overflowing with waste.  

Diva Cup | www.maplealps.com

Some Things You Should Know:


There are many different brands of cups. I have personally only used Diva Cup, however, I really want to try some others. If you have no success with the first one, that's fine - pick another brand and try again! There are all sorts - including a collapsable one that fits right into your purse!

There is a learning curve. But don't give up! Give it at least 3 months before you completely throw it to the side.

Make sure you know how to dispose of your cup. Depending on the material your particular cup of choice, each manufacturer offers a suggested way of disposal. Diva Cup (made of healthcare grade non-absorbant silicone) suggests cutting up your cup before throwing it into the trash, while some cups are able to be recycled. The good news is that with proper use cups may last quite some time before you have to worry about that. 

Get ready to save money! While the cup was more money up front (and most cost between $20 and $40), it only took a few months before it paid for itself. Of course, it depends on what products you typically purchase, but eventually, it all evens out (and is it just me, or is the price for tampons and pads going up?!).

Some people say that cramps will go away with menstrual cup usage. I have not found this to be even remotely true :) 

Depending on your flow, you can keep the cup in for 12 hours - with no leakage risk! No more gross tampon string or diaper-feeling pad. I'm grossed out just thinking about it. This also is a tremendous help in my case as a teacher, since I can't leave every 4-8 hours to make changes in my life... Just saying. Confession: I've had mine in for 24 hours with not even a slight issue. Just depends!

You may still need a backup. Especially when you're still perfecting the art of the cup. You could still use a liner, or if you're like me and feel accomplishment in a low-to-no-waste week, something more eco-friendly like period underwear (more on that in another post). 

Menstrual cups are easy to find! I got mine at the drugstore, but you can get them pretty much anywhere - and they're cheapest online (Grab one from Amazon here). Bonus: they come with a cute carrying case for in-between cycles!

This is not a paid ad. I just love the cup that much! Of course, if you choose to use my link to purchase your own cup, I will get a few cents - but really, I just felt the need to share the wonderful thing that is the menstrual cup!

I Switched to a Menstrual Cup and Here is What Happened | www.maplealps.com

In Conclusion,

I have had an awesome experience with a menstrual cup: I feel better about having less waste production, I love knowing that there are no harmful chemicals leeching into my body, no risk of leaks and embarrassment and that I'm saving a whole lot of money! There are tons of reasons to switch to a menstrual cup!


What's your "green" way to deal with red times of the month? Let me know below! Any questions?


Why I switched to a menstrual cup | www.maplealps.com

I Quit Makeup. Here's What Happened.

Lifestyle, Natural Living, Health, BlogAmanda Walter | Maple Alps13 Comments

I quit makeup.

Over two years ago.

Now, before you stop reading because you think I’m going  to tell you to stop wearing makeup, I’m not going to do any such thing.

I just felt like writing about my experiences - good and bad - when I stopped wearing makeup. Consider this more a personal reflection, and take from it what you wish!

This girl quit makeup | www.maplealps.com

Why did I do it?

I’ll be honest: I have no radical reason as to why I stopped wearing makeup. I just….decided to one morning. Don’t get me wrong - I really did enjoy wearing it and putting time and effort into my appearance, but when I questioned my motives (and some of the ingredients and testing methods of certain companies), I didn’t like what I was seeing. It was all about me and what people saw when they saw me. I realized that what I looked like shouldn’t matter as much as what my character was - so I took a break. My break has stretched to two years now, and I can’t say that I don’t miss it at times (again, for mostly superficial reasons), but I took some time to reflect on it.


It saves me time

I seriously used to be really good at getting up really early in the morning and getting myself together and ready. Over the years, however, it has gotten harder and harder to do that - mainly due to my light sleep and having a husband who goes to bed later than I would prefer. I am still obligated to wake up much earlier than I would like with these circumstances, but when I need the extra ten minutes, I take it. When I don’t need the extra time, it is now used in a much more productive way; I can extend the time for prayer, or eat a slower breakfast. It’s nice to not rush. It’s also nice to not spend so much time in front of the mirror looking goofy.


It saves me money

As I was going through the cosmetic aisle the other day, I was shocked to see some of the prices on brands I used to buy regularly. I did some quick math in my head and the number that came up was quite large. Being much more intentional about my money is important, and prioritizing what I spend it on is part of that. I was glad to realize that a large portion I would normally not even think about spending on makeup “essentials” now goes into savings.


It saves me stress

I don’t know about you, but I can’t stand the extra stress. Why should I have to worry about whether my mascara is truly waterproof when it rains, or if my nail polish is chipping in an unattractive manner? I have enough to worry about in a day, so adding on these factors was just making me more of a basket-case than I already am! Honestly, going back to the time thing as well, the stress of running out of time in the morning is too much for my delicate heart.


It saves my skin

It is nothing new that a lot of makeup and other toiletries are made with questionable ingredients that harm our bodies. Yes, there are fantastic alternatives I’m sure, but I’ve not explored these [often expensive] alternatives. Honestly, I could do with putting fewer layers of “stuff” on my extremely absorptive skin anyway. I don’t have the best skin, and skipping the chemical-filled cosmetics has improved it so much.


My Husband Still Loves Me

Yup.


In Conclusion

I never set out to see how long I could go without painting a nail or lining my eye (sounds so weird when I say it that way). I just got fed up and started on a journey I didn’t know I was going on. I doubt that I’ll ever go back, and if I do, I do. For now, I am content with my choice and glad for the extra time, money and peace of mind it contributes to.


What do you think about my experience? Experienced anything similar?


4 Simple DIY Moisturizing Face Mask For This Winter

Natural LivingAmanda Walter | Maple Alps6 Comments

The cruelty of winter on our face requires that we give it an extra moisturizing boost once in a while. Whether it’s outside where the air is freezing and dry or indoors where we’ve cranked up the heat on maximum, the winter season results can be brutal on our skin!

A simple solution for this would be to go out and purchase a moisturizing mask. However, sometimes we just don’t feel like spending all that money on face masks. Plus, who wants to go outside in this horrible weather when we can just stay at home and cozy up in front of the fireplace?

 For this reason, we’ll help you explore and browse through your fridge items and use everyday items to create 4 simple DIY moisturizing face mask for this winter!

And even though it might seem weird at first, these DIY masks can be even more effective than store-bought ones. Plus, you’ll know that everything you apply on your skin is completely natural and doesn’t cause any irritation to your sensitive winter skin. 

 
4 Simple DIY Moisturizing Face Mask For This Winter | www.maplealps.com
 

1.    Avocado Mask

Avocados are full of healthy fatty acids, vitamins, and minerals that will deeply nourish and moisturize even the driest skin. Vitamins E and A in the avocado will gently feed and repair the tiny cracks of your dry skin, while its rich antioxidant content will fight off aging skin and destroy free radicals. For an even stronger moisturizing effect, mix the avocado with olive oil, yogurt, and honey, all of which with incredible hydrating effects.


Ingredients for the Avocado Mask:

●      Avocado – half
●      Honey – one teaspoon
●      Olive oil – one teaspoon
●      Yogurt – one tablespoon


Preparation: Smash half an avocado with a fork as much as you can, until there aren’t any large chunks of it left. Making the avocado as smooth as possible will allow a better application. Next, mix the avocado paste with one teaspoon of honey (best effects can be seen with raw honey), one teaspoon of olive oil, and one tablespoon of yogurt.

Mix well and apply on your face. Leave the mask on for 15 to 20 minutes and then rinse well with lukewarm water. You will immediately notice a huge difference and your skin will feel incredibly smooth! 

 
4 Simple DIY Moisturizing Face Mask For This Winter | www.maplealps.com
 

2.    Banana Mask

Bananas are rich in potassium, which is known to be a deep moisturizer for dry skin. Furthermore, they contain Vitamins B and A, as well as amino acids which will give your skin an extra boost of strength and elasticity. In this banana mask, we will also add yogurt which contains calcium and lactic acid – known for their skin benefits. And finally, our third and last ingredient will be olive oil which is an incredible hydrating oil that keeps moisture in.


Ingredients for the Banana Mask:

●      Banana – 1, ripe
●      Yogurt – 1/3 cup
●      Olive Oil – 1 teaspoon


Preparation: Use a fork or a similar tool to smash one ripe banana until there aren’t any chunks and large pieces left. The smoother you make this banana paste, the less messy the application process will be. After you’ve pureed the banana, add 1/3 cup of yogurt and 1 teaspoon of olive oil and mix all these ingredients together. Once you’ve prepared your mask, apply it with your hands or a clean brush and wait for 15 to 30 minutes.

 After that, wash off the mask with lukewarm water and gently pat-dry your face. The results will be amazing!

 
4 Simple DIY Moisturizing Face Mask For This Winter | www.maplealps.com
 

3.    Coconut Oil Mask

Coconut oil is one of the best ingredients when it comes to DIY moisturizing face masks. Not only that it smells divine, but it’s also one of the most hydrating oils ever! Aside from that, coconut oil has antiviral and antibacterial properties which will prevent acne formation. The best addition to a coconut oil mask is brown sugar. Exfoliation is a “must” for dry winter skin, and brown sugar is the perfect way to make this 2 in 1 mask + exfoliator.


Ingredients for the Coconut Oil Mask:

●      Coconut Oil – 1 tablespoon
●      Brown Sugar – 1 tablespoon


Preparation: Coconut oil is solid in cold temperatures, so you will need to leave it to melt either at room temperature or to heat it up a bit. However, make sure that you don’t make the oil warm or hot. Once you’ve melted your tablespoon of coconut oil, add 1 tablespoon of brown sugar. Apply this mask by massaging it on your face in circular motions.

This will exfoliate your skin incredibly well! After you’re done with exfoliating and applying the mask, leave it on for 10 to 15 minutes. Finally, rinse your face with lukewarm water and feel the bliss! 


4 Simple DIY Moisturizing Face Mask For This Winter | www.maplealps.com
 

4.    Egg White Mask

Our final suggestion for those cold winter days is the egg white mask. Egg whites are high in collagen and proteins which will bring back your skin’s youth and elasticity. Trust us, you’ll feel 10 years younger after this mask! Aside from the egg white which will tighten your skin, this mask also contains almond oil for hydration, as well as oats which are some of the best natural moisturizers and gentle exfoliators.


Ingredients for the Egg White Mask:

●      Egg White – 1
●      Coconut Oil – 1 teaspoon
●      Oats – small handful


Preparation: First whisk the egg white with a fork until it’s white and foamy. Next, add 1 teaspoon of liquid coconut oil and mix it together with the egg white. And finally, add a small handful of oats into the mixture. Combine together all these ingredients well, and your mask is ready. Start applying the finished product on your face with the help of your fingers or a clean brush.

It’s best to apply the mask while you’re wearing old clothes and standing over the bathroom sink because it can be a bit messy. Leave the mask on for 15 to 25 minutes, or until you feel that the egg white is starting to dry. Then, rinse it with warm water and pat-dry your skin. 


The above 4 simple DIY moisturizing masks for this winter will all give you incredible results, just like any expensive store-bought mask would. So, don’t hesitate to try them all and tell us your impressions! 


4 Simple DIY Moisturizing Face Mask For This Winter | www.maplealps.com

My name’s Manoju or Manju as my friends like to call me. I blog at Mangolift.com and I believe that no one should be judged by their appearance. I started Mangolift to help people improve their skin and so that they can walk with their heads up high.

If you are interested in guest posting, check out the guest posting guidelines for Maple Alps, here.


5 Anti-Aging Natural Oils for Gorgeously Beautiful & Ageless Skin

Natural LivingAmanda Walter | Maple AlpsComment

The market is flooded with numerous beauty products which help in hiding uninvited signs of aging like wrinkles, fine lines, and sagging skin. Though it’s great to have too many options in the anti-aging products, a lot of women are usually left confused or unsure about what will work for their skin or what will not. Instead of wasting time in searching one of the best anti-aging products, it would be great to turn towards Mother Nature to get gorgeously beautiful and ageless skin naturally. When talking about nature and natural products, one cannot ignore the essence of natural anti-aging oils. Extracted from leaves, roots, stems, flowers, and resins, essential oils comprise several potent and effective ingredients which are proven quite effective for skin and overall health. Keep reading to know about the 5 natural oils which are known for their amazing anti-aging properties and incredibly beautifying effects.

5 Anti-Aging Natural Oils for Gorgeously Beautiful & Ageless Skin | www.maplealps.com


1. Lavender Oil

Extracted from the flowers of Lavandula angustifolia through the steam distillation process, the versatile essential oil of lavender is known for its magical effects. Being a great source of natural vitamins and antioxidants, lavender oil works wonderfully in slowing down the aging clock and preventing wrinkles. A gentle massage of skin using a blend of lavender oil with any carrier oil is proven every effective in reducing the appearance of age spots. Moreover, it freshens up the complexion as well.


2. Frankincense Oil

Comprising great anti-inflammatory, astringent, and antiseptic properties, the essential oil of Frankincense is proven quite effective in slowing down the visible signs of aging, including wrinkles and sagging skin. Its powerful astringent property is also helpful in protecting the skin cells from getting damaged. Besides removing the age spots, the essential oil of frankincense is also effective in reinvigorating the skin, improving skin elasticity, balancing skin pH, and promoting healthy cell regeneration. You can also use this as an effective solution to combat acne, stretch marks, and wrinkles around your eyes. Mix a few drops of frankincense oil in a tablespoon of carrier oil and apply it gently over your skin for a younger look.

5 Anti-Aging Natural Oils for Gorgeously Beautiful & Ageless Skin | www.maplealps.com

3. Geranium Oil

Extracted from the leaves of Pelargonium odorantissimum plant, geranium essential oil works wonderfully for those who are struggling with premature signs of aging. Being a great anti-inflammatory and astringent agent, geranium oil is appreciated for its ability to make the skin flawless and youthful. When used regularly in combination with a carrier oil, geranium oil tightens the skin, regulates the production of sebum, reduces the appearance of pores, tones skin, so on. This is probably why it is so popular among women from all walks of the life. Mix a few drops of this oil with your regular body lotion and apply it gently over the affected area regularly before going to bed to get a young, beautiful, and glowing skin within few days.

4. Pomegranate Seed Oil

Botanically known as Punica grantum, pomegranate seed oil is the flag bearer when it comes to the selection of anti-aging natural oils. Comprising a lot of bioflavonoids, the pomegranate oil penetrates deeper into the layer of skin and works best in protecting the skin from the harsh rays of the sun. High in Omega-5 fatty acid and antioxidants, this oil works magically in reducing the free radicals which cause skin thickening, wrinkles, and other signs of premature aging. Mix a few drops of this oil in your regular moisturizer and gently apply it to your skin to get younger, toner, and beautiful appearance.

5 Anti-Aging Natural Oils for Gorgeously Beautiful & Ageless Skin | www.maplealps.com

5. Jojoba Oil

The carrier oil of Jojoba is proven quite effective in diminishing the fine lines, age spots, wrinkles, and other common signs of premature aging. Jojoba oil comprises various Vitamin contents which are effective in speeding up the rapid regeneration of the skin cells. A regular massage of the facial skin with a blend of jojoba and any other carrier oil like almond is one of the best options to get a firm, smooth, and younger skin within no time.

This is all you need to know about the five effective natural anti-aging oils. If you want to get the best benefits, you need to approach a reliable supplier for buying 100% pure natural oils. As some of the people have quite sensitive skin, it is advised to consult with an expert before buying any oil to avoid any kind of skin problems.


This was a guest post by Abhinav Kumar Singh, who is a renowned aromatherapist and essential oil educator with 8 years of professional expertise. His passion is to help others by sharing crucial information about aromatherapy, information, usage and tips from essential oils and allied natural extracts. He has been advocating about the benefits of natural essential oils through writing and speeches to reach out thousands of persons through his blogs, articles, and speeches. Find more of his works at Allin Exporters. Apart from this, he loves traveling to new places and spending time in his backyard.

If you are interested in guest posting, check out the guest posting guidelines for Maple Alps, here. 


DIY All-Purpose Cleaner

Natural LivingAmanda Walter | Maple Alps30 Comments

Making your own cleaning supplies is nothing new. Besides the fact that humans have done it for long enough, I've noticed that the web is filled with different DIY solutions that are supposedly easy to make, easy to use, easy on the wallet, and easy on your body. 

How could I resist? Well, I didn't even try to resist. 

This post contains affiliate links

DIY All-Purpose Cleaner | www.maplealps.com

It all started when I was reminded that caulk is actually a thing. Growing up, we used distilled water in the kettle, so it was never a problem. Now, however, with filtered water going in, I noticed an ever so slight buildup. I knew vinegar was good for caulk, and to be honest, there is no way I would have felt comfortable putting any sort of cleaner in there anyway. I was reminded of my time abroad when my roommate and I would clean our shower every week with vinegar to get rid of and prevent caulk. My mind wandered, as it does, and I wondered what else I could clean with vinegar. My husband, however, hates the smell of vinegar, so I knew I needed to find a solution. Spoiler alert: I found a one.

Enter: lemons.

lemon vinegar all purpose cleaner | www.maplealps.com
DIY All-Purpose Cleaner lemon | www.maplealps.com

I had heard that adding lemons to vinegar and then letting it all sit for two weeks would make the vinegar smell less like vinegar. I thought it would be worth a try. Plus, the idea of having a jar of lemons sitting around for a while looking all pretty was very appealing to me. In went lemon skins, in went vinegar, and there it sat. I thought about using the leftover lemon juice to make a delicious lemon cake but opted to deodorize my cutting boards instead. Worked amazingly.

After two weeks (and a few days to be exact), I finally had the opportunity to strain my concoction. I may have been a little too excited, but it was worth it. While pouring, I was overwhelmed by the smell of lemons. The vinegar odour was faint, but still there.

Once strained (I had to do it a few times because I wasn't very dilligent in making sure I got rid of the pulp from my peels), I diluted it (1 part of the mixture and 2 parts water) and added it to my glass spray bottle. I took the great opportunity to clean my bathroom counters and was quite pleased with the result. I will mention that it took a bit more elbow grease than usual, but the result as a work-out as well as a clean-up. Score!

Related: The Ultimate Spring Simplifying Guide

It wasn't just that it was squeaky clean afterwards either! I was not paranoid about using chemicals and felt good about the natural ingredients I was using. There are so many chemicals hiding in household cleaning products (read about some here)

One concern I did have was whether or not it was actually cleaning. After some research, I found that vinegar really is a great disinfectant!

I have been using this cleaner for over a month now, and I have yet to have any complaints. With Spring just around the corner, I'll truly be putting it to the test  

Related: The Ultimate Spring Simplifying Guide

DIY All-Purpose Cleaner | www.maplealps.com
 

Recap: DIY All-Purpose Cleaner

  • Put lemon skins (avoiding pulp) in large jar

  • Cover with distilled vinegar

  • Leave to sit for two weeks

  • Strain well

  • Dilute mixture in a spray bottle (1 part mixture to 2 parts water)

  • Get cleaning!


Things you may need:


What about you? Do you make your own cleaners? Excited about some Spring Cleaning?


DIY All-Purpose Cleaner | www.maplealps.com