Maple Alps

Chia Peach Frozen Pops (vegan)

RecipesAmanda Walter | Maple Alps23 Comments

Since moving to Michigan, I've appreciated Summer that much more. It seems that the Winter months drag on and on and on and Spring and Summer bring a breath of fresh air. I find myself physically aching for warm weather near the end of a cold spell and longing for warm evenings on the porch or at the beach.

I need to go outside and embrace my Summer! School will be starting before I know it, and soon the Winter will be back, so I need to get my outdoor time in now. I've been enjoying walking, jogging or riding bikes to the lake and walking along the shore. I also love just laying in the backyard or sitting on the porch - the grass is so soft and the sun makes me so happy!

Before I leave though, I'll give you this recipe to help you stay cool.

This post contains affiliate links.

Chia Peach Frozen Pops (vegan) | www.maplealps.com

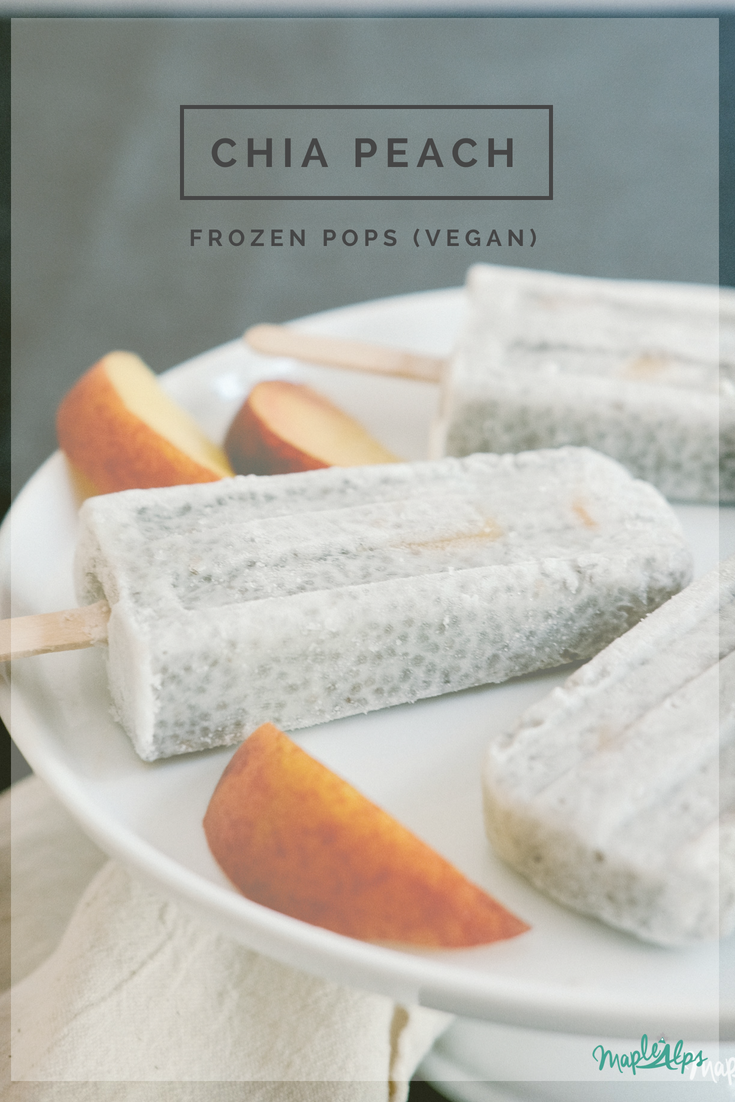
You all know by now that I like chocolate, and while I have made chocolate versions of these frozen pops (ummm, chocolate peanutbutter chia please!!) and even fudgiscles, I decided to share a non-chocolate frozen treat with you today! I got the inspiration from a smoothie, really, and thought that fruit chunks in a popsicle would be a fun idea. Besides, it makes them prettier in my opinion.

Of course, you can use any kind of fruit in your pops. I chose peaches, because peaches. I love peaches. But I could imagine using raspberries or blueberries, or anything, really!

Chia Peach Frozen Pops (vegan) | www.maplealps.com

Waiting for these babies to freeze is a true test of patience, but they are well worth the wait!

Chia Peach Frozen Pops (vegan) | www.maplealps.com

Chia Peach Frozen Pops

Makes: About 6 popsicles Prep: 6.5 Hours

1 ¼ cup coconut milk

½ cup soy

¼ cup chia seeds

½ - 1 TBSP cane sugar (depending on how sweet you want it)

Canned or fresh peach (or any other fruit, really!)


1. Whisk all ingredients except peaches together in a small bowl

2. Let mixture sit for 15-30 minutes, until it has become thick

3. Spoon a bit of the mixture into each popsicle mold.

4. Add fruit as you wish, alternating between the mixture and the fruit

5. Freeze 6 hours, until frozen.

6. To remove, run mold under hot water for 10-15 seconds and pull out carefully. To store, I wrap the pops in parchment paper (separately) and keep them in a freezer bag. You could also get really fancy and grab these plastic sleeves for frozen treats. 


For these treats you may need:


What do you like doing in the Summer months?


Chia Peach Frozen Pops (vegan) | www.maplealps.com

Skopelos

TravelAmanda Walter | Maple Alps7 Comments

Whenever I thought of Greece, I thought of Santorini because I wanted to see all the pretty white houses and everything that was in The Sisterhood of the Traveling Pants. It's been on my bucket list forever, and when we started planning our Greece trip, I thought I'd be able to cross it off. Well, it's still on my list because we went to Skopelos instead. But I still loved it. As long as I have water, beaches, and my honey, I'll be content. The world has many places to explore. Here are some photos from our trip!

Skopelos | www.maplealps.com

I inherited my grandmother's motion sickness, so I'm never a fan of ferry rides. Sitting inside got me so sick that as I stumbled out into the fresh air, I thought I might tip over the railings. Alas, the fresh air did me good. See? Not everything about travel is glamourous. 

Skopelos | www.maplealps.com

Very cool though: we saw dolphins swimming alongside the ferry. I didn't even bother taking a picture because I was enjoying it far too much. I had never seen them in the wild before.

Skopelos | www.maplealps.com

I was still happy to see white buildings once we reached our destination and could have explored for hours more!

Skopelos | www.maplealps.com

I mean, how cute are these window sills?!? I could have spent more hours walking through these streets!

Skopelos | www.maplealps.com

I'm pretty certain that I photographed every cat I saw in Greece, but I'm sparing you from most of those pictures - be glad. 

Skopelos | www.maplealps.com

I think I was most impressed by how clean Greece was in general! I definitely was not expecting that. We had a fantastic time!


Will I Be Still?

FaithAmanda Walter | Maple Alps4 Comments

We live in a noisy world.

A few months ago, as I sat at my desk to work, I became aware of the theme from Family Feud playing. I knew that it was Family Feud because I used to watch it with my siblings growing up (an unimportant detail). I realized it couldn’t be coming from our little apartment, since we owned no TV or loudspeakers, and I was home alone. The floor started vibrating from the intense frequencies, and it clicked that it was our downstairs neighbors, who often had the TV volume turned all the way up (or at least it sounded that way).

I relocated to my husband’s empty office, and not seconds after getting myself comfortable in his cushy swivel chair, a car alarm sounded—ringing through the air for a good amount of time before being shut off. A truck then sped out of the neighboring community. I hope whoever it was wasn’t trying to be stealthy because the whole block heard them.

I thought that just maybe, it was now my turn. My turn to have silence. However, people across the way started shouting, and a convenience store truck (I didn’t even know those existed) started driving around wailing, “The Entertainer” out of its built-in speakers. The downstairs neighbors started wrestling elephants, and an exceptionally long train drove by. Judging from the duration of the tones, I’m guessing that every train car had its own horn to toot.

We live in a noisy world - or at least I do.


Chocolate Chai Ice Cream (vegan + gluten free + nut free)

RecipesAmanda Walter | Maple Alps18 Comments

Summer is here and I fully intend on enjoying every last second of it! The problem, however, is that summer only lasts a few weeks before Autumn comes creeping along and I have to break out the coats again. I do love the Fall, but I have been waiting and my body has been aching for sunshine that comes right now. The Winter was so long. So, so long. Thankfully, one can still eat ice cream in the Winter. It's just that it can be enjoyed outside in the Summer. 

Chocolate Chai Ice Cream (vegan + gluten free + nut free) | www.maplealps.com

The other day, I decided to break out my ice cream maker. You have to understand that I bought it years ago on a whim because it was a good deal. Since getting it, however, I have used it probably a grand total of….thrice. I was never able to achieve the creamy goodness that comes from the store, so I gave up. And then I had no time to experiment. And then it was in our basement still in the box. So yes, it was really time to either use it or lose it. I decided to try my hand at homemade ice cream again. I tried and tried some more until I finally came up with what I’m sharing with you today: a tasty chocolate chai ice cream.

The best part is that there is no dairy in it! I do love ice cream, but the dairy stuff makes me ill.

Chocolate Chai Ice Cream (vegan + gluten free) | www.maplealps.com

The base is a coconut cream and chai-infused soy milk mix that is pretty tasty if I do say so myself! It’s also creamy and has the right texture. Beyond that, it is inexpensive to make and will save you $5/pint of the dairy-free stuff at the store. You can’t get much better than that, really.

I wasn’t actually planning to make a chai-infused ice cream. I was just brainstorming flavours and I looked over and saw some loose tea that I had picked up a while back and it hit me:

chai + chocolate = seconds, please!

Chocolate Chai Ice Cream (vegan + gluten free) | www.maplealps.com

I already have a ton of ideas for future flavours, so stay tuned as I experiment and develop ice cream-making skills. 

Chocolate Chai Ice Cream (vegan + gluten free) | www.maplealps.com

Chocolate Chai Ice Cream (vegan + gluten free)

Makes: about 8 servings Prep: About 6 hours

What you need:

  • 2 cups soy milk

  • 1 can (15 ounces) coconut cream

  • 1 TBSP chai tea (loose tea or 1-2 tea bags)

  • ⅓ cup arrowroot powder

  • ¼ tsp salt

  • ½ tsp vanilla

  • ¼ cup cocoa powder

  • 2-3 TBSP maple syrup or agave (depending on how sweet you want it)


What to do:

  1. Heat 2 cups of soy milk

  2. Steep the chai tea in the milk for 10-15 minutes, depending on how strong you want the chai flavour (I used a loose-leaf decaffeinated chai from Teavana)

  3. After the tea is done steeping, add it, along with the rest of the ingredients, to a high speed blender. Mix well until there are no clumps

  4. Add mixture to a large saucepan, and heat up slowly, continually stirring, until you have a pudding-like consistency.

  5. Completely cool the mixture (about 4 hours in the refrigerator)

  6. Put into ice cream maker and churn according to instructions

  7. Add ice cream to a shallow container and freeze for a few hours. It will stay creamy for a few days in the freezer- just let it sit out for a few minutes after the first day till it softens a bit!


Have you ever made your own ice cream?


Chocolate Chai Ice Cream (vegan + gluten free) | www.maplealps.com

Beginners Guide to Gardening: 7 Tips

Guest PostsAmanda Walter | Maple Alps4 Comments

Hi! My name is Colleen and I’m the author of Frenchie Farm, a blog dedicated to urban homesteading, healthy living, and clean eating. My husband, Ben, and I live on our family farm in the Chicago suburbs with our toddler, 2 french bulldogs, 2 goats, and 10 chickens.

I’m a city girl at heart and never anticipated that I would fall in love with a more simplified lifestyle. When my husband asked me to move to his family’s farm about three years ago, I thought he was crazy. I lived in Chicago for 5+ years, and I wasn’t on board with suburban living, let alone living on a farm. Somehow my persuasive husband convinced me that it was a good idea, and I’m so glad that he did.  We remodeled his grandparents’ old house into the farmhouse of our dreams and dove head first into creating a homestead of our own.

When Amanda reached out and inquired if I would be interested in writing a “Beginners Guide to Gardening” post, I immediately jumped at the opportunity. Although gardening comes naturally to my husband, I’ve always struggled to succeed at it. I was determined to develop my own green thumb when we started our homestead, and I’m so happy to share the following gardening tips. I promise that these 6 tips are beginner friendly and will help you create the garden of your dreams!

Beginners Guide to Gardening: 7 Tips | www.maplealps.com

STEP 1: Seeds versus Plants

If you are a beginner gardener, then I would strongly recommend purchasing mature adult plants rather than growing vegetable plants from seeds. Although planting a garden from seeds is a more cost efficient option, it also requires significantly more planning and prep work, which can be tricky for a beginner gardener.


STEP 2: Do your Research Before Purchasing Plants

Taking time to prepare and plan for your garden is essential for success! Before you head out to the nearest store and randomly start purchasing vegetable plants, consider the following:

  • Keep in mind your climate and the length of your growing season - this will be dependent on where you live geographically

  • Create a list of best suited plants for your geographic location - be sure to do a quick Google search to determine which plants thrive in your climate zone


STEP 3: Planning your Garden Space

Determine how much space you want to dedicate to your garden.

  • Are you planting in pots or directly in the ground? Some plants excel in pots (i.e. strawberries because you can easily control the water intake), while other plants thrive in the ground (i.e. pumpkins, squashes, and gourds perform better when planted directly in the soil because it provides them adequate space while also giving stems direct soil contact)

  • Each vegetable plant has different spacing guidelines. Be sure to read the instruction tag on the vegetable plant before planting!

  • Do your best to resist the urge to plant your veggies too close together. Confession - we still get really excited when planting our veggies and sometimes try to squeeze in a few extra ones. DON’T! Overcrowding vegetable plants will prevent your veggies from reaching maturity, so it’s definitely not worth it.

Beginners Guide to Gardening: 7 Tips | www.maplealps.com


STEP 4: Purchase Necessary Materials

Now that you’ve taken the time to research and plan, it’s time to purchase your planting materials! The below items can be used as a general guide, but be sure to reference your specific gardening plans when creating your own list:

  • VEGGIES!

  • Planters (if using)

  • Organic garden soil

  • Gardening gloves

  • Small garden shovel

  • Watering can

  • Labels (if you have a larger garden, it can be easy to forget what you purchased!)

  • Tomato Cage/Trellis (if applicable) - check out our blog for a DIY version that we recently made!

  • Patience (HA, my husband thought I should add this bullet point because I’m the most impatient person when it comes to waiting for plants to grow!)


STEP 5: Plant your Garden


The day is here, it’s time to plant! Refer back to your specific gardening plans and START PLANTING!

  • Remember, be sure to read the instruction tag on the vegetable plant before planting.

  • Follow the instructions on the tag and have fun!


Beginners Guide to Gardening: 7 Tips | www.maplealps.com

STEP 6: WATER & WEED!

The hard work of researching, planning, purchasing, and planting is behind you. Now you need to make sure those vegetable plants stay healthy and keep growing!

  • Water your plants every day for the first week.

  • After the first week, you can get away with watering a few times a week. As long as the soil is always moist, your vegetables should continue to thrive.

  • I tend to avoid this one, but don’t forget to weed your garden! If weeds take over, your plants won’t grow and thrive.


STEP 7: ENJOY!

Seriously, fresh produce from your garden tastes amazing. Not only is it super satisfying to know that you’ve grown your own (organic!) food, the taste and overall quality of the food is unlike anything you can purchase from the grocery store. Enjoy those yummy veggies and consider dehydrating, canning, or freezing the extras to have on hand all year round.


Beginners Guide to Gardening: 7 Tips | www.maplealps.com

Well friends, I hope you’re feeling motivated and excited to start planning your garden! I would love for you to stop by Frenchie Farm to let me know how your garden turns out this year. I’m happy to answer any questions and most importantly, have fun!


Follow Colleen and her adventures on Instagram and Facebook